 |
Fingering Patterns - All Major Chords
At first glance, playing chords on the guitar can look complex. All those strings, all those fingering options. It looks like a lot to memorize. But, it is important to understand that you can learn a pretty wide chord vocabulary by memorizing the fingering patterns involved.
Chords form the backbone of a song. Both rhythm players and lead guitarists need to learn chords. The more chords you know, the easier it will be to improvise, write songs, and perform with confidence.
What is a Major Chord?
A major chord is derived from the major scale, which always follows a certain pattern. It is the root note, or first note, of the scale, the third note, and the fifth note. For example, a C major scale includes the notes C, D, E, F, G, A, and B. The C major chord, therefore, will include the notes C, E, G. This pattern works for all the scales.

Before you learn about the chord fingerings, take some time to understand the major scale and how it is played. Once you find the major scale for each note, find the first, third, and fifth note for each. Play them individually. Here are a few more examples.
Same as above but with the E Major Scale and G Major Scale. Don’t need a picture of the fretboard here, though. The important thing are the scales with the first, third, and fifth notes highlighted.


The major chord has a distinct sound and is usually described as sounding “warm”. It usually conveys positive emotions in a piece. As you move through this lesson, acquaint yourself with the distinct sound of the major chords. This will help you develop your ear and become a better player.
Introduction to Fingering Patterns
The guitar can be very mathematical. But, instead of getting bogged down in the structure of the instrument, just know that once you learn certain fingering patterns, or shapes, these shapes can occur anywhere on the fretboard. Once you understand how they work, they can really help you build a larger chord vocabulary.
Fingering Patterns for Major Chords
There are several approaches you can take to learn the fingering patterns for major chords. The first is to find a chord book and memorize the fingerings listed individually. This method will help you learn more chords, but it is often cumbersome and time consuming. Especially since each chord can be found up and down the neck multiple times. See examples of fingerings, below.
As an exercise, find a chord book and look at the instructions for all the major chords. Play a few of them. Try to memorize one or two. How long did it take you to really learn all those chords so they are committed to memory? It takes a while.
Learning set fingering patterns, however, greatly cuts the learning curve. Each chord has its own shape. The pattern that emerges from this shape is called a voicing. What happens when you move the shapes? Well, if you move up and down the fretboard, the voicing stays the same. If the shape is moved from one string to the other the voicing will change. You can use the same shapes up and down the neck to play other major chords.
First Steps - Five Chord Patterns
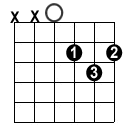
There are five basic major chord fingerings that are used to form the base for the other major chord fingerings. These five chords listed below are called whole tone chords.
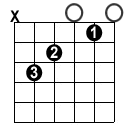
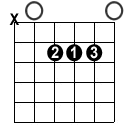
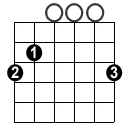
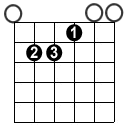
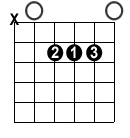
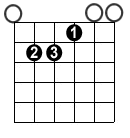
Chord diagrams represent the fret board. The vertical line to the far left represents the low E string and the line to the far right represents the high E string. The horizontal lines represent the frets. The numbers on the strings represent which finger will press that note down. If there is no number, that string won’t be pressed. It will either be open, or denoted with an “x” which means you don’t play that string at all.
Here are the chord patterns and their diagrams:
C Major Chord |
Major Chord |
|
 |
 |
|
A G Major Chord |
E Major Chord |
|
 |
 |
|
D Major Chord |
|
|
 |
||
Take some time to memorize these chords and their patterns before you move on to the next step. This is the first step to what is known as the CAGED system. As previously mentioned, all major chords have their root as the first note of the major scale. Each of these five chords all have a different root. This is an important thing to keep in mind as you work through the rest of this lesson. Keep in mind that you can use this shape throughout the neck, wherever the notes are the same.
Using the Five Chords
You may notice that B major and F major are missing from the chords listed, above. To form them, you will need to know the A major shapes and E major shapes. In this case, the A major shape turns into B major and the F major shape turns into F major.
A Major |
B Major |
|
 |
 |
|
E Major |
F Major/p> |
|
 |
 |
|
Once you memorize all these chords and their shapes, you can use them throughout the neck. Knowing where these major chords are throughout the guitar will help you be a stronger player and will help increase your improvisational skills, help you write songs, and quickly increase your chord vocabulary.
 |  |